文章主题:
书接上文,在《【AIGC】本地部署 ollama(gguf) 与项目整合》
章节的最后,我使用了
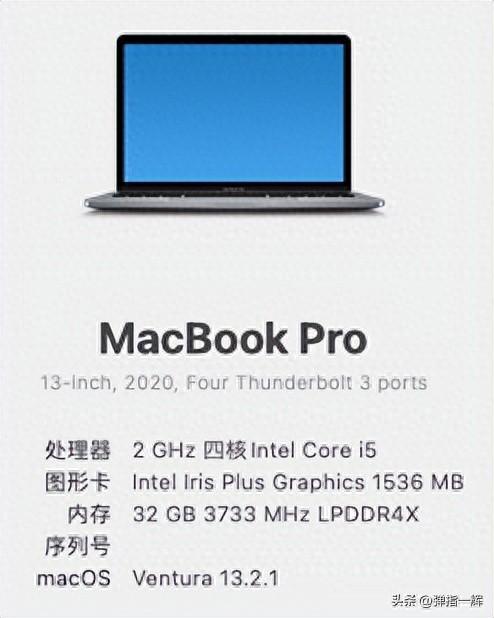
qwen1_5-14b-chat-q4_k_m.gguf 进行了ollama 与项目的整合。在非 Stream 模式下需要 89 秒才完成一次问答,虽然整个过程还有其他的程序占用一部分内存和 CPU 资源,但响应速度也实在是太慢了些。🌟【MacBook Pro 2020版】✨13寸Intel芯巅峰体验,🔥图中一窥究竟!🚀这款创新设备搭载了最新的处理器技术,让您在处理复杂任务时如行云流水般流畅。💻无论是专业设计、高清视频编辑还是高效办公,都能轻松应对,满足您的多元化需求。👀屏幕清晰锐利,色彩准确,无论是文字还是图像都呈现出细腻的质感。🌈1600×900分辨率,让每一个细节都跃然眼前。🔋持久续航,告别频繁充电,长达10小时的使用时间让您全天无忧。🔋✨优质工艺,一体化金属机身,彰显科技与美感的完美融合。💪坚固耐用,经得起日常使用和出差旅行的考验。若您对这款MacBook Pro有任何疑问或想要深入了解,欢迎留言或私信,我们将竭诚为您服务!💌#MacBookPro2020 #Intel芯 #高效办公
Ollama 性能验证
为了解决这个问题,上网找了很多 ollama 的资料,基本上可以总结为以下三点:
ollama 会自动适配可用显卡。若显卡资源没有被利用上无非就是型号不支持

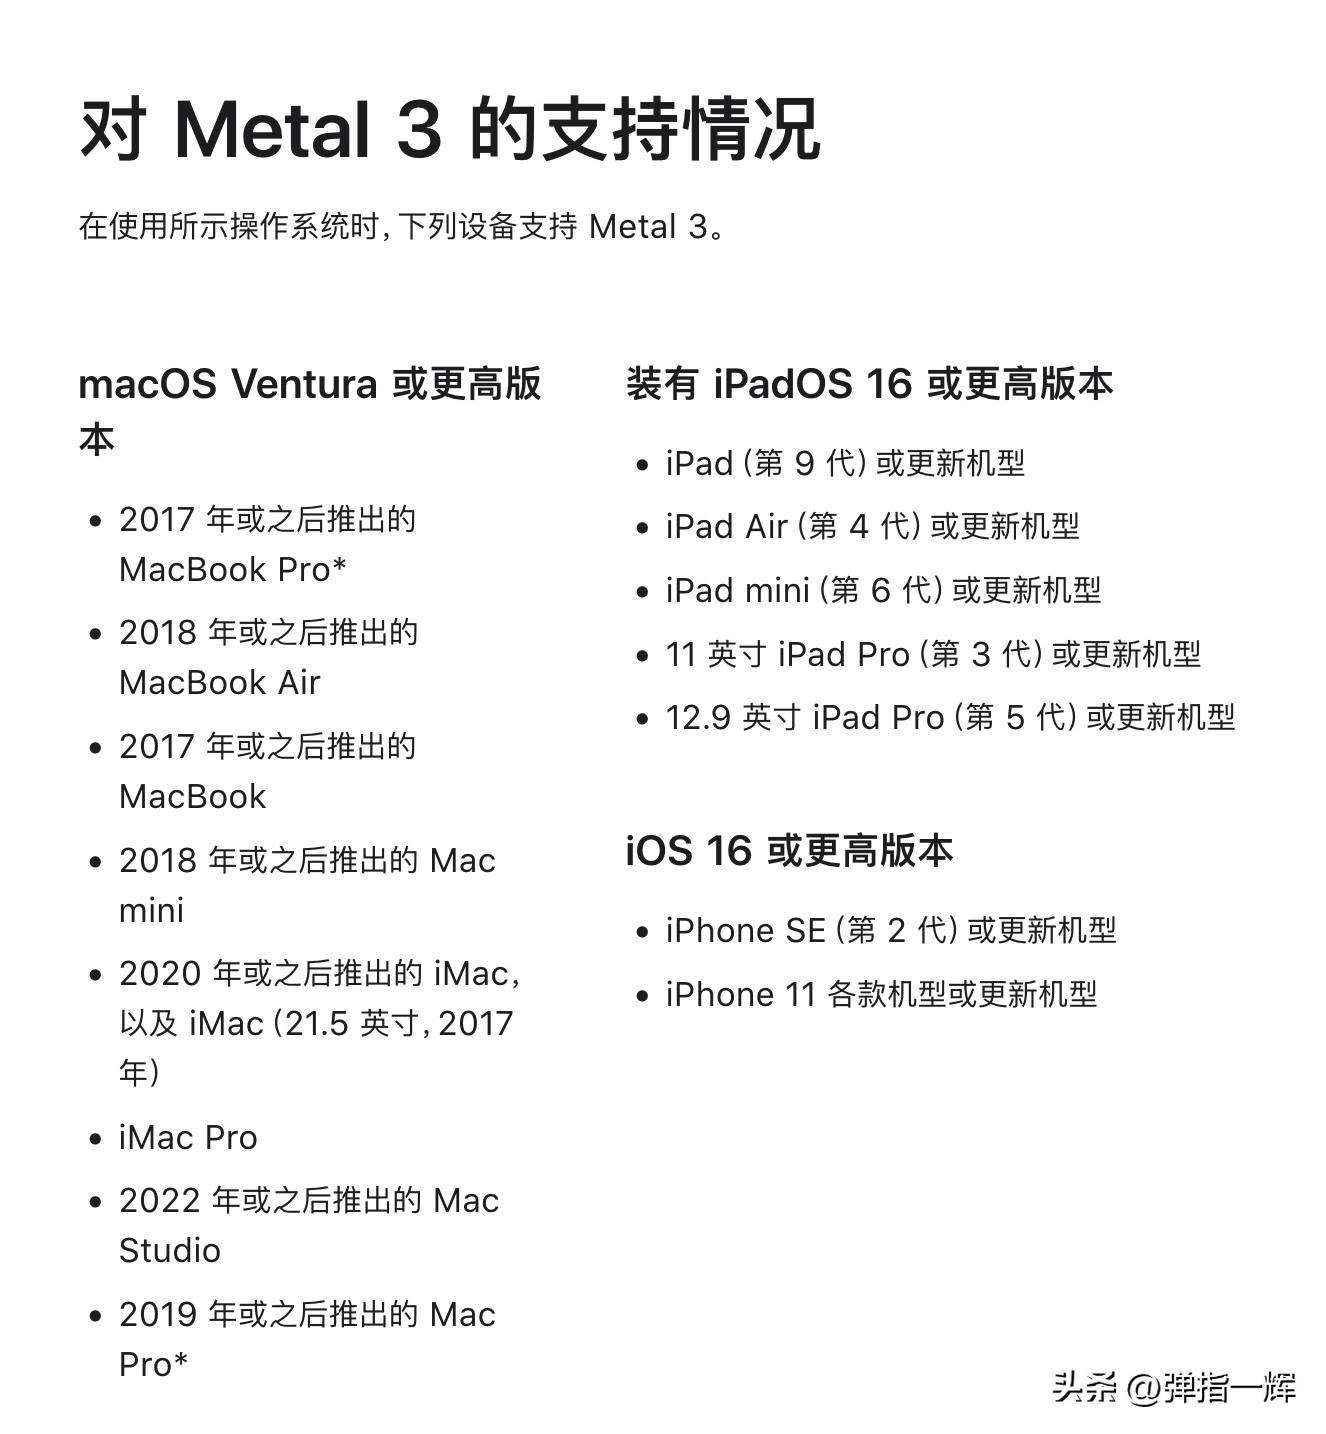
✨如果您的MBP是2020年型号,那么好消息来了!它很可能已经配备了Metal 3技术,这意味着您将能体验到更流畅、高效的图形处理。-metal 3是苹果最新一代的专业级图形架构,为创新和高质量内容提供了强大的支持。想要确保这一点,您可以查阅Apple的官方系统要求或联系客服进行确认。记得更新操作系统以充分利用这一先进技术哦!💪💻
若官网说的是真的话,ollama 应该会自动使用 Metal GPUs 来进行推理。难道是 gguf 的缘故只能适配到 CPU ?带着这个疑问我又下载了一个普通的版本进行对比验证,直接通过 python 进行调用(程序跟之前的一样没有发生改变),如下图:
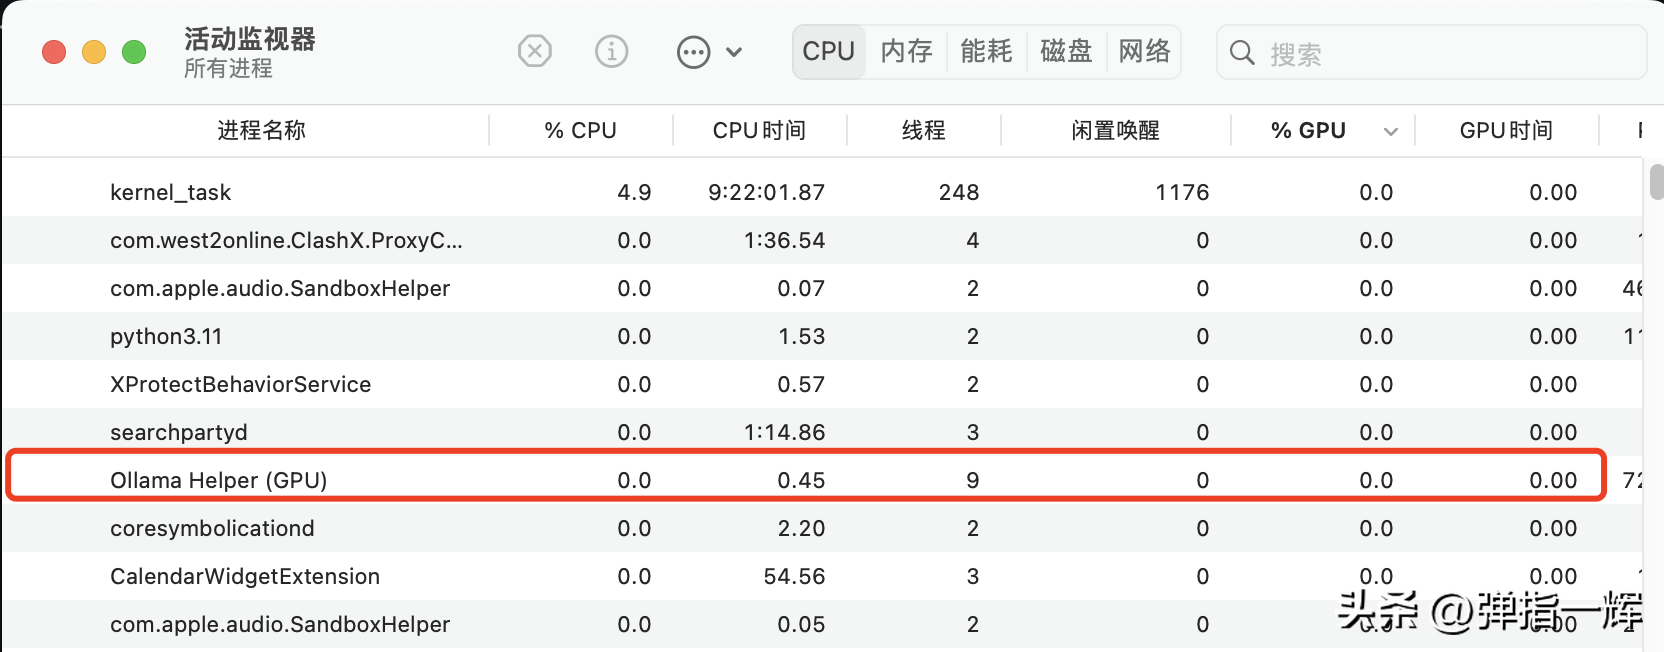
# 使用 ollama 调取一般版本的 qwen 模型(qwen:14b-chat-q4_K_M),耗时 69 秒 (transformer) (base) MacBook-Pro:python yuanzhenhui$ /Users/yuanzhenhui/anaconda3/envs/transformer/bin/python /Users/yuanzhenhui/Documents/code_space/git/processing/python/tcm_assistant/learning/local_model.py >>> function ollama_transfor_msg totally use 69.74513030052185 seconds >>> 是的,中医理论可以解释并尝试解决这些症状。 全身乏力和心跳过速可能是由多种原因引起的。在中医看来,这可能与脏腑功能失调、气血不畅、阴阳失衡等因素有关。 例如,心气不足可能导致心跳过速,而脾虚则可能导致全身乏力。另外,如果肝脏的功能不好,也可能导致这种症状。 因此,治疗方案可能会根据你的具体情况进行调整,可能包括中药、针灸、推拿等方法。同时,中医强调调养身体的整体健康,包括饮食习惯、生活方式等方面,也会对改善这些症状有帮助。 # 使用 ollama 调取 gguf 版本 qwen 模型(qwen:14b-chat-q4_K_M),耗时 90 秒 (transformer) (base) MacBook-Pro:python yuanzhenhui$ /Users/yuanzhenhui/anaconda3/envs/transformer/bin/python /Users/yuanzhenhui/Documents/code_space/git/processing/python/tcm_assistant/learning/local_model.py >>> function ollama_transfor_msg totally use 90.6007969379425 seconds >>> 中国传统医学,也就是中医,对于全身乏力和心跳过速等症状有自己的理论解释和治疗方案。 1. 全身乏力:中医认为这是“气虚”或者“阳虚”的表现。气是维持人体生命活动的物质基础,如果气不足,就会出现乏力、疲劳等症状。可能的原因包括饮食不当、劳累过度、久病体弱等。中医会通过调理饮食,增加营养,适当运动,以及服用补气的药物来改善。 2. 心跳过速:中医将其称为“心悸”或“心动过速”,可能与心脏气血不足、心阴亏损或者有某些病理因素如痰饮、瘀血等有关。中医治疗会根据具体病因采用益气养阴、化痰活血的方法,有时还会使用中药如炙甘草汤、归脾汤等。 然而,值得注意的是,虽然中医理论能够解释和在一定程度上处理这些症状,但在现代医学中,全身乏力伴随心跳过速也可能是心脏疾病(如心律失常)或其他疾病的症状。如果患者持续出现这些症状,应尽快就医,由专业医生进行诊断和治疗。在调用过程中打开了活动监视器看了一下,两次调用均未使用系统 GPU 进行推理,如下图:
这也就能够印证了 ollama 所能使用的 Metal GPUs 算力只针对 M1 及其以上的芯片(貌似?),并且即使在使用 CPU 算力的情况下使用官方提供的 Model 比 gguf 的版本响应速度更快。
但是…难道就要这样放弃了吗?No!
既然 ollama 这条路走不通,那就再换个方法吧(来自 MBP Intel 芯片用户最后的倔强)。
基于 llama-cpp-python 试验
之前也说过除了 ollama 之外,国外的大神给我们提供了另一条路 llama.cpp。在兜兜转转之后找到它的一个变种 llama-cpp-python。
Getting Started – llama-cpp-python
这里面对于如何配置 Metal GPUs 有了详尽的介绍(不死心的我继续去验证 Metal GPUs 的可用性)。
首先下载一个miniforge3 并重新配置一个 python 环境,如下图:
Release Release 24.3.0-0 · conda-forge/miniforge · GitHub

由于是 Intel 芯片,因此选择下面的那个脚本。接着就可以开始安装了。如下图:
(base) yuanzhenhui@MacBook-Pro Documents % bash Miniforge3-MacOSX-x86_64.sh Welcome to Miniforge3 24.3.0-0 In order to continue the installation process, please review the license agreement. Please, press ENTER to continue >>> Miniforge installer code uses BSD-3-Clause license as stated below. Binary packages that come with it have their own licensing terms and by installing miniforge you agree to the licensing terms of individual packages as well. They include different OSI-approved licenses including the GNU General Public License and can be found in pkgs/<pkg-name>/info/licenses folders. … CAUSED AND ON ANY THEORY OF LIABILITY, WHETHER IN CONTRACT, STRICT LIABILITY, OR TORT (INCLUDING NEGLIGENCE OR OTHERWISE) ARISING IN ANY WAY OUT OF THE USE OF THIS SOFTWARE, EVEN IF ADVISED OF THE POSSIBILITY OF SUCH DAMAGE. Do you accept the license terms? [yes|no] >>> yes Miniforge3 will now be installed into this location: … Extracting mamba-1.5.8-py310h6bde348_0.conda Installing base environment… Transaction Prefix: /Users/yuanzhenhui/miniforge3 Updating specs: – conda-forge/osx-64::bzip2==1.0.8=h10d778d_5[md5=6097a6ca9ada32699b5fc4312dd6ef18] … – conda-forge/osx-64::conda==24.3.0=py310h2ec42d9_0[md5=edeb7e98b7b2ff05133c584aa2c732ca] – conda-forge/osx-64::mamba==1.5.8=py310h6bde348_0[md5=d8f96626a2a8515c9e51b90001345db6] Package Version Build Channel Size ───────────────────────────────────────────────────────────────────────────────────── Install: ───────────────────────────────────────────────────────────────────────────────────── + bzip2 1.0.8 h10d778d_5 conda-forge … + conda 24.3.0 py310h2ec42d9_0 conda-forge + mamba 1.5.8 py310h6bde348_0 conda-forge Summary: Install: 69 packages Total download: 0 B ───────────────────────────────────────────────────────────────────────────────────── Transaction starting Linking bzip2-1.0.8-h10d778d_5 … Linking mamba-1.5.8-py310h6bde348_0 Transaction finished To activate this environment, use: micromamba activate /Users/yuanzhenhui/miniforge3 Or to execute a single command in this environment, use: micromamba run -p /Users/yuanzhenhui/miniforge3 mycommand installation finished. Do you wish to update your shell profile to automatically initialize conda? This will activate conda on startup and change the command prompt when activated. If youd prefer that condas base environment not be activated on startup, run the following command when conda is activated: conda config –set auto_activate_base false You can undo this by running `conda init –reverse $SHELL`? [yes|no] [no] >>> yes no change /Users/yuanzhenhui/miniforge3/condabin/conda no change /Users/yuanzhenhui/miniforge3/bin/conda … no change /Users/yuanzhenhui/miniforge3/etc/profile.d/conda.csh modified /Users/yuanzhenhui/.zshrc ==> For changes to take effect, close and re-open your current shell. <== /Users/yuanzhenhui/miniforge3/lib/python3.10/site-packages/mamba/mamba.py:889: DeprecationWarning: conda.cli.main.generate_parser is deprecated and will be removed in 24.9. Use `conda.cli.conda_argparse.generate_parser` instead. p = generate_parser() no change /Users/yuanzhenhui/miniforge3/condabin/conda no change /Users/yuanzhenhui/miniforge3/bin/conda … no change /Users/yuanzhenhui/miniforge3/etc/profile.d/conda.csh no change /Users/yuanzhenhui/.zshrc No action taken. Added mamba to /Users/yuanzhenhui/.zshrc ==> For changes to take effect, close and re-open your current shell. <== Thank you for installing Miniforge3!安装 miniforge3 之后就不再使用原来的 anaconda3 环境了。若继续使用之前的开发环境(anaconda3/transformer)就出现报错,如下图:
(base) yuanzhenhui@MacBook-Pro Documents % pip uninstall llama-cpp-python -y WARNING: Skipping llama-cpp-python as it is not installed. (base) yuanzhenhui@MacBook-Pro Documents % conda activate transformer (transformer) yuanzhenhui@MacBook-Pro Documents % pip uninstall llama-cpp-python -y WARNING: Skipping llama-cpp-python as it is not installed. (transformer) yuanzhenhui@MacBook-Pro Documents % CMAKE_ARGS=“-DLLAMA_METAL=on” pip install -U llama-cpp-python –no-cache-dir … Building wheels for collected packages: llama-cpp-python Building wheel for llama-cpp-python (pyproject.toml) … error error: subprocess-exited-with–error × Building wheel for llama-cpp-python (pyproject.toml) did not run successfully. │ exit code: 1 ╰─> [358 lines of output] *** scikit-build-core 0.9.2 using CMake 3.28.2 (wheel) *** Configuring CMake… 2024-04-29 20:22:16,427 – scikit_build_core – WARNING – libdir/ldlibrary: /Users/yuanzhenhui/anaconda3/envs/transformer/lib/libpython3.11.a is not a real file! … on or disable this warning with LLAMA_CCACHE=OFF — CMAKE_SYSTEM_PROCESSOR: x86_64 — x86 detected CMake Warning (dev) at vendor/llama.cpp/CMakeLists.txt:1261 (install): Target llama has RESOURCE files but no RESOURCE DESTINATION. This warning is for project developers. Use -Wno-dev to suppress it. … — Configuring done (1.4s) — Generating done (0.0s) — Build files have been written to: /var/folders/74/mmb55nf927x36pb3bv43_zd40000gn/T/tmpd893s2ka/build *** Building project with Ninja… Change Dir: /var/folders/74/mmb55nf927x36pb3bv43_zd40000gn/T/tmpd893s2ka/build Run Build Command(s): /private/var/folders/74/mmb55nf927x36pb3bv43_zd40000gn/T/pip-build-env-hw7rsios/normal/lib/python3.11/site-packages/ninja/data/bin/ninja -v [1/30] cd /var/folders/74/mmb55nf927x36pb3bv43_zd40000gn/T/tmpd893s2ka/build/vendor/llama.cpp && echo Embedding\ Metal\ library && sed -e /#include “ggml-common.h”/r /private/var/folders/74/mmb55nf927x36pb3bv43_zd40000gn/T/pip-install-nff9008u/llama-cpp-python_b58ebf47e75e4f37bfdd92450cffebaa/vendor/llama.cpp/ggml-common.h -e /#include “ggml-common.h”/d < /private/var/folders/74/mmb55nf927x36pb3bv43_zd40000gn/T/pip-install-nff9008u/llama-cpp-python_b58ebf47e75e4f37bfdd92450cffebaa/vendor/llama.cpp/ggml-metal.metal > /var/folders/74/mmb55nf927x36pb3bv43_zd40000gn/T/tmpd893s2ka/build/autogenerated/ggml-metal-embed.metal && echo .section\ __DATA,__ggml_metallib > /var/folders/74/mmb55nf927x36pb3bv43_zd40000gn/T/tmpd893s2ka/build/autogenerated/ggml-metal-embed.s && echo .globl\ _ggml_metallib_start >> /var/folders/74/mmb55nf927x36pb3bv43_zd40000gn/T/tmpd893s2ka/build/autogenerated/ggml-metal-embed.s && echo _ggml_metallib_start: >> /var/folders/74/mmb55nf927x36pb3bv43_zd40000gn/T/tmpd893s2ka/build/autogenerated/ggml-metal-embed.s && echo .incbin\ \“/var/folders/74/mmb55nf927x36pb3bv43_zd40000gn/T/tmpd893s2ka/build/autogenerated/ggml-metal-embed.metal\” >> /var/folders/74/mmb55nf927x36pb3bv43_zd40000gn/T/tmpd893s2ka/build/autogenerated/ggml-metal-embed.s && echo .globl\ _ggml_metallib_end >> /var/folders/74/mmb55nf927x36pb3bv43_zd40000gn/T/tmpd893s2ka/build/autogenerated/ggml-metal-embed.s && echo _ggml_metallib_end: >> /var/folders/74/mmb55nf927x36pb3bv43_zd40000gn/T/tmpd893s2ka/build/autogenerated/ggml-metal-embed.s Embedding Metal library … *** CMake build failed [end of output] note: This error originates from a subprocess, and is likely not a problem with pip. ERROR: Failed building wheel for llama-cpp-python Failed to build llama-cpp-python ERROR: Could not build wheels for llama-cpp-python, which is required to install pyproject.toml-based projects既然如此就在 miniforge3 中重建一个新的开发环境吧,如下图:
(base) yuanzhenhui@MacBook-Pro ~ % conda info –envs # conda environments: # /Users/yuanzhenhui/anaconda3 /Users/yuanzhenhui/anaconda3/envs/autokeras /Users/yuanzhenhui/anaconda3/envs/transformer base * /Users/yuanzhenhui/miniforge3 (base) yuanzhenhui@MacBook-Pro ~ % conda create -n llama python=3.11.7 Retrieving notices: …working… done Channels: – defaults – conda-forge Platform: osx-64 Collecting package metadata (repodata.json): done Solving environment: done ==> WARNING: A newer version of conda exists. <== current version: 24.3.0 latest version: 24.4.0 Please update conda by running $ conda update -n base -c conda-forge conda ## Package Plan ## environment location: /Users/yuanzhenhui/miniforge3/envs/llama added / updated specs: – python=3.11.7 The following packages will be downloaded: package | build —————————|—————– bzip2-1.0.8 | h6c40b1e_5 151 KB … zlib-1.2.13 | h4dc903c_0 96 KB ———————————————————— Total: 31.4 MB The following NEW packages will be INSTALLED: bzip2 pkgs/main/osx-64::bzip2-1.0.8-h6c40b1e_5 … zlib pkgs/main/osx-64::zlib-1.2.13-h4dc903c_0 Proceed ([y]/n)? y Downloading and Extracting Packages: Preparing transaction: done Verifying transaction: done Executing transaction: done # # To activate this environment, use # # $ conda activate llama # # To deactivate an active environment, use # $ conda deactivate (base) yuanzhenhui@MacBook-Pro ~ % conda activate llama (llama) yuanzhenhui@MacBook-Pro ~ %接下来就可以安装 llama-cpp-python 了。由于我想用 Metal 作为模型的推理算力,因此需要添加 CMAKE_ARGS 参数并指定变量 “-DLLAMA_METAL=on”。如下图:
(llama) yuanzhenhui@MacBook-Pro ~ % CMAKE_ARGS=”-DLLAMA_METAL=on” pip install -U llama-cpp-python –no-cache-dir … Building wheels for collected packages: llama-cpp-python Building wheel for llama-cpp-python (pyproject.toml) … error error: subprocess-exited-with-error × Building wheel for llama-cpp-python (pyproject.toml) did not run successfully. │ exit code: 1 ╰─> [357 lines of output] *** scikit-build-core 0.9.3 using CMake 3.28.2 (wheel) *** Configuring CMake… 2024-04-30 10:25:02,785 – scikit_build_core – WARNING – Cant find a Python library, got libdir=/Users/yuanzhenhui/miniforge3/envs/llama/lib, ldlibrary=libpython3.11.a, multiarch=darwin, masd=None … ninja: build stopped: subcommand failed. *** CMake build failed [end of output] note: This error originates from a subprocess, and is likely not a problem with pip. ERROR: Failed building wheel for llama-cpp-python Failed to build llama-cpp-python ERROR: Could not build wheels for llama-cpp-python, which is required to install pyproject.toml-based projects如上图所示,在 cmake 的时候出现了错误,这个时候重新检查自己电脑里面的 xcode 是否已经安装完成,没有的话就重新安装一次。如下图:
(llama) yuanzhenhui@MacBook-Pro ~ % sudo xcode-select -r Password: (llama) yuanzhenhui@MacBook-Pro ~ % xcode-select -p /Applications/Xcode.app/Contents/Developerxcode 解决了之后基本上就能够顺利完成安装,如下图:
(llama) yuanzhenhui@MacBook-Pro ~ % CMAKE_ARGS=“-DLLAMA_METAL=on” pip install -U llama-cpp-python —no-cache-dir … Successfully built llama-cpp-python Installing collected packages: typing-extensions, numpy, MarkupSafe, diskcache, jinja2, llama-cpp-python Successfully installed MarkupSafe-2.1.5 diskcache-5.6.3 jinja2-3.1.3 llama-cpp-python-0.2.65 numpy-1.26.4 typing-extensions-4.11.0最后安装一下 llama-cpp-python 的 server 版本,如下图:
(llama) yuanzhenhui@MacBook-Pro ~ % pip install llama-cpp-python[server] Requirement already satisfied: llama-cpp-python[server] in ./miniforge3/envs/llama/lib/python3.11/site-packages (0.2.65) … Installing collected packages: sniffio, PyYAML, python-dotenv, pydantic-core, idna, h11, click, annotated-types, uvicorn, pydantic, anyio, starlette, pydantic-settings, starlette-context, sse-starlette, fastapi Successfully installed PyYAML-6.0.1 annotated-types-0.6.0 anyio-4.3.0 click-8.1.7 fastapi-0.110.3 h11-0.14.0 idna-3.7 pydantic-2.7.1 pydantic-core-2.18.2 pydantic-settings-2.2.1 python-dotenv-1.0.1 sniffio-1.3.1 sse-starlette-2.1.0 starlette-0.37.2 starlette-context-0.3.6 uvicorn-0.29.0完成之后就能够启动 gguf 模型了。由于 llama_cpp_python 是 python 应用因此采用 python3 关键字启动,如下图:
(llama) yuanzhenhui@MacBook-Pro 1e2e136ec2ff4e5ea297d4da75581b6bd4b40ca8 % python3 -m llama_cpp.server –model /Users/yuanzhenhui/.cache/huggingface/hub/models–Qwen–Qwen1.5-14B-Chat-GGUF/snapshots/1e2e136ec2ff4e5ea297d4da75581b6bd4b40ca8/qwen1_5-14b-chat-q4_k_m.gguf –n_gpu_layers 1 llama_model_loader: loaded meta data with 21 key-value pairs and 483 tensors from /Users/yuanzhenhui/.cache/huggingface/hub/models–Qwen–Qwen1.5-14B-Chat-GGUF/snapshots/1e2e136ec2ff4e5ea297d4da75581b6bd4b40ca8/qwen1_5-14b-chat-q4_k_m.gguf (version GGUF V3 (latest)) llama_model_loader: Dumping metadata keys/values. Note: KV overrides do not apply in this output. llama_model_loader: – kv 0: general.architecture str = qwen2 … llama_model_loader: – type f32: 201 tensors … llm_load_vocab: missing pre-tokenizer type, using: default llm_load_vocab: llm_load_vocab: ************************************ llm_load_vocab: GENERATION QUALITY WILL BE DEGRADED! llm_load_vocab: CONSIDER REGENERATING THE MODEL llm_load_vocab: ************************************ llm_load_vocab: llm_load_vocab: special tokens definition check successful ( 421/152064 ). llm_load_print_meta: format = GGUF V3 (latest) … llm_load_tensors: ggml ctx size = 0.46 MiB ggml_backend_metal_log_allocated_size: allocated buffer, size = 209.09 MiB, ( 213.38 / 1536.00) llm_load_tensors: offloading 1 repeating layers to GPU llm_load_tensors: offloaded 1/41 layers to GPU llm_load_tensors: CPU buffer size = 8759.57 MiB llm_load_tensors: Metal buffer size = 209.09 MiB ………………………………………………………………………………. llama_new_context_with_model: n_ctx = 2048 llama_new_context_with_model: n_batch = 512 llama_new_context_with_model: n_ubatch = 512 llama_new_context_with_model: flash_attn = 0 llama_new_context_with_model: freq_base = 1000000.0 llama_new_context_with_model: freq_scale = 1 ggml_metal_init: allocating ggml_metal_init: found device: Intel(R) Iris(TM) Plus Graphics ggml_metal_init: picking default device: Intel(R) Iris(TM) Plus Graphics ggml_metal_init: using embedded metal library ggml_metal_init: error: Error Domain=MTLLibraryErrorDomain Code=3 “program_source:1879:9: error: invalid type const constant int64_t & (aka const constant long &) for buffer declaration constant int64_t & ne00, ^~~~~~~~~~~~~~~~~~~~~~~~ program_source:1879:19: note: type int64_t (aka long) cannot be used in buffer pointee type constant int64_t & ne00, ^ … ^ llama_new_context_with_model: failed to initialize Metal backend … ValueError: Failed to create llama_context warning: failed to munlock buffer: Cannot allocate memory (llama) yuanzhenhui@MacBook-Pro 1e2e136ec2ff4e5ea297d4da75581b6bd4b40ca8 %上面在执行指令中传入“–n_gpu_layers 1”参数将一层处理交给 GPU 来实现推理用于验证是否有效。但通过输出得知,虽然显卡是已经检测到了,无奈在初始化 Metal 的时候出现问题了(估计还是 Intel 显卡不兼容的问题),这个时候不得不放弃这个想法了。
但还是不死心… 在 github 中找到了另外一个解决方案,如下图:
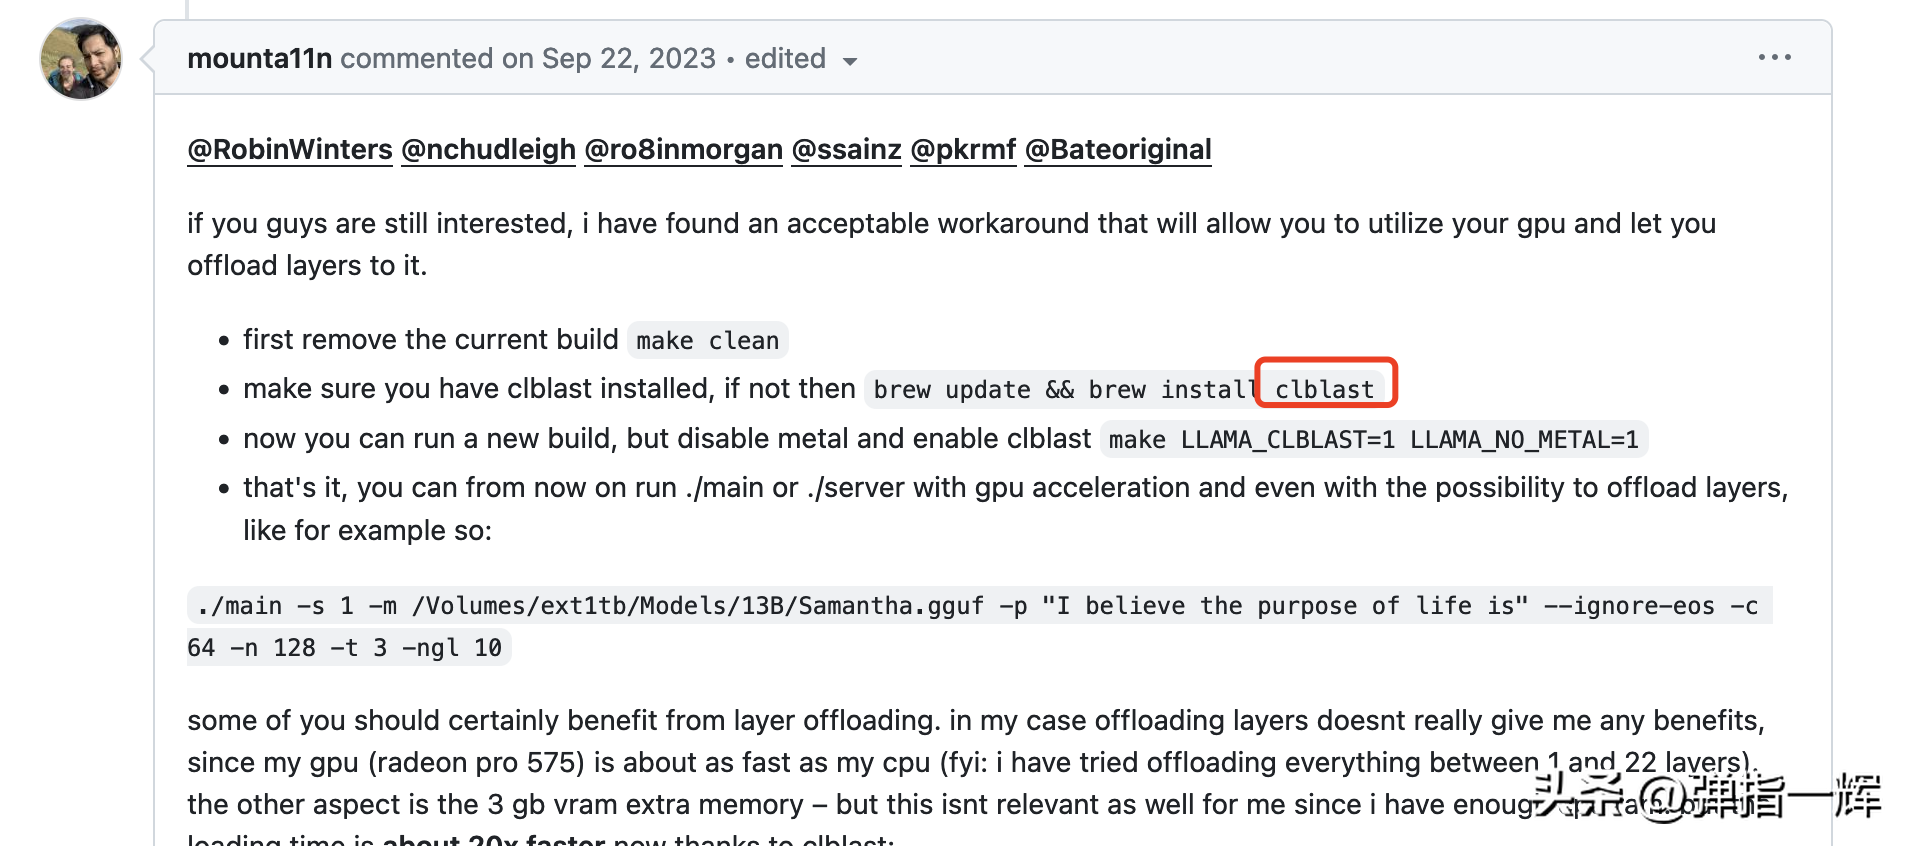
虽然 Metal GPUs 不行,但看情况可以用 clblast 来试试,那么先安装 clblast 吧,如下图:
(llama) yuanzhenhui@MacBook-Pro ~ % brew update && brew install clblast ==> Downloading https://mirrors.aliyun.com/homebrew/homebrew-bottles/bottles-portable-ruby/portable-ruby-3.1.4.el_capitan.bottle.tar.gz ########################################################################################################################################### 100.0% ==> Pouring portable-ruby-3.1.4.el_capitan.bottle.tar.gz Updated 2 taps (homebrew/core and homebrew/cask). … ==> Fetching clblast ==> Downloading https://mirrors.aliyun.com/homebrew/homebrew-bottles/clblast-1.6.2.ventura.bottle.tar.gz ########################################################################################################################################### 100.0% ==> Pouring clblast-1.6.2.ventura.bottle.tar.gz /usr/local/Cellar/clblast/1.6.2: 41 files, 13.2MB ==> Running `brew cleanup clblast`… … Removing: /Users/yuanzhenhui/Library/Caches/Homebrew/wget--1.21.4.ventura.bottle.tar.gz… (1.5MB)接下来就删除原来的 llama-cpp-python 并重新安装。同理,这次需要加上 CMAKE_ARGS 参数 “-DLLAMA_CLBLAST=on” ,如下图:
(llama) yuanzhenhui@MacBook-Pro ~ % pip uninstall llama-cpp-python -y Found existing installation: llama_cpp_python 0.2.69 Uninstalling llama_cpp_python-0.2.69: Successfully uninstalled llama_cpp_python-0.2.69 (llama) yuanzhenhui@MacBook-Pro ~ % CMAKE_ARGS=”-DLLAMA_CLBLAST=on” FORCE_CMAKE=1 pip install -U llama-cpp-python –no-cache-dir … Building wheels for collected packages: llama-cpp-python Building wheel for llama-cpp-python (pyproject.toml) … error error: subprocess-exited-with-error × Building wheel for llama-cpp-python (pyproject.toml) did not run successfully. │ exit code: 1 ╰─> [93 lines of output] *** scikit-build-core 0.9.3 using CMake 3.28.2 (wheel) *** Configuring CMake… 2024-05-04 16:29:27,291 – scikit_build_core – WARNING – Cant find a Python library, got libdir=/Users/yuanzhenhui/miniforge3/envs/llama/lib, ldlibrary=libpython3.11.a, multiarch=darwin, masd=None loading initial cache file /var/folders/74/mmb55nf927x36pb3bv43_zd40000gn/T/tmp1w3bk5cq/build/CMakeInit.txt — The C compiler identification is AppleClang 14.0.3.14030022 — The CXX compiler identification is AppleClang 14.0.3.14030022 … CMake Error in vendor/llama.cpp/CMakeLists.txt: Imported target “clblast” includes non-existent path “/Library/Developer/CommandLineTools/SDKs/MacOSX13.sdk/System/Library/Frameworks/OpenCL.framework” in its INTERFACE_INCLUDE_DIRECTORIES. Possible reasons include: * The path was deleted, renamed, or moved to another location. * An install or uninstall procedure did not complete successfully. * The installation package was faulty and references files it does not provide. — Generating done (0.0s) CMake Generate step failed. Build files cannot be regenerated correctly. *** CMake configuration failed [end of output] note: This error originates from a subprocess, and is likely not a problem with pip. ERROR: Failed building wheel for llama-cpp-python Failed to build llama-cpp-python ERROR: Could not build wheels for llama-cpp-python, which is required to install pyproject.toml-based projects额… 又报错了,但可以看出主要是因为 “
/Library/Developer/CommandLineTools/SDKs/MacOSX13.sdk/System/Library/Frameworks/OpenCL.framework” 路径缺失,通过 ls 得知在“
/Library/Developer/CommandLineTools/SDKs/”路径下只存在MacOSX.sdk、MacOSX10.14.sdk 和 MacOSX10.15.sdk 并没有 MacOSX13.sdk 的身影。 (llama) yuanzhenhui@MacBook-Pro bin % cd /Library/Developer/CommandLineTools/SDKs/ (llama) yuanzhenhui@MacBook-Pro SDKs % ls MacOSX.sdk MacOSX10.14.sdk MacOSX10.15.sdk (llama) yuanzhenhui@MacBook-Pro SDKs % cd ../.. (llama) yuanzhenhui@MacBook-Pro Developer % sudo rm -rf CommandLineTools Password: (llama) yuanzhenhui@MacBook-Pro Developer % xcode-select –install xcode-select: note: install requested for command line developer tools (llama) yuanzhenhui@MacBook-Pro Developer % ls /Library/Developer/CommandLineTools/SDKs/ MacOSX.sdk MacOSX12.3.sdk MacOSX12.sdk MacOSX13.1.sdk MacOSX13.3.sdk MacOSX13.sdk尝试了很多办法都不奏效,于是把心一横就将“CommandLineTools”目录删除重新安装一次,结果发现还真的可以。接着就重新下载并编译 llama-cpp-python,如下图:
(llama) yuanzhenhui@MacBook-Pro Developer % CMAKE_ARGS=“-DLLAMA_CLBLAST=on” FORCE_CMAKE=1 pip install -U llama-cpp-python —no-cache-dir … Successfully built llama-cpp-python Installing collected packages: llama-cpp-python Successfully installed llama-cpp-python-0.2.69但是…在运行模型后发现跟之前 Metal GPUs 结果是一样的(这里就不展示了),那么剩下的就只能 CPU Only。同理,先删除 llama-cpp-python 再重新安装,这次使用 “-DLLAMA_BLAS=ON -DLLAMA_BLAS_VENDOR=OpenBLAS” 作为编译参数,如下图:
(llama) yuanzhenhui@MacBook-Pro ~ % CMAKE_ARGS=”-DLLAMA_BLAS=ON -DLLAMA_BLAS_VENDOR=OpenBLAS” FORCE_CMAKE=1 pip install -U llama-cpp-python –no-cache-dir pip install llama-cpp-python[server] … Successfully built llama-cpp-python Installing collected packages: pip, install, llama-cpp-python Attempting uninstall: pip Found existing installation: pip 23.3.1 Uninstalling pip-23.3.1: Successfully uninstalled pip-23.3.1 Successfully installed install-1.3.5 llama-cpp-python-0.2.69 pip-24.0成功运行模型,但是…
(llama) yuanzhenhui@MacBook-Pro ~ % python3 -m llama_cpp.server –model /Users/yuanzhenhui/.cache/huggingface/hub/models–Qwen–Qwen1.5-14B-Chat-GGUF/snapshots/1e2e136ec2ff4e5ea297d4da75581b6bd4b40ca8/qwen1_5-14b-chat-q4_k_m.gguf –n_gpu_layers 0 –n_batch 32 –n_ctx 512 llama_model_loader: loaded meta data with 21 key-value pairs and 483 tensors from /Users/yuanzhenhui/.cache/huggingface/hub/models–Qwen–Qwen1.5-14B-Chat-GGUF/snapshots/1e2e136ec2ff4e5ea297d4da75581b6bd4b40ca8/qwen1_5-14b-chat-q4_k_m.gguf (version GGUF V3 (latest)) llama_model_loader: Dumping metadata keys/values. Note: KV overrides do not apply in this output. llama_model_loader: – kv 0: general.architecture str = qwen2 … llama_model_loader: – type f32: 201 tensors llama_model_loader: – type q5_0: 20 tensors llama_model_loader: – type q8_0: 20 tensors llama_model_loader: – type q4_K: 221 tensors llama_model_loader: – type q6_K: 21 tensors llm_load_vocab: missing pre-tokenizer type, using: default llm_load_vocab: llm_load_vocab: ************************************ llm_load_vocab: GENERATION QUALITY WILL BE DEGRADED! llm_load_vocab: CONSIDER REGENERATING THE MODEL llm_load_vocab: ************************************ llm_load_vocab: llm_load_vocab: special tokens definition check successful ( 421/152064 ). llm_load_print_meta: format = GGUF V3 (latest) … llm_load_tensors: ggml ctx size = 0.23 MiB llm_load_tensors: offloading 0 repeating layers to GPU llm_load_tensors: offloaded 0/41 layers to GPU llm_load_tensors: CPU buffer size = 8759.57 MiB ………………………………………………………………………………. llama_new_context_with_model: n_ctx = 512 llama_new_context_with_model: n_batch = 32 llama_new_context_with_model: n_ubatch = 32 llama_new_context_with_model: flash_attn = 0 llama_new_context_with_model: freq_base = 1000000.0 llama_new_context_with_model: freq_scale = 1 llama_kv_cache_init: CPU KV buffer size = 400.00 MiB llama_new_context_with_model: KV self size = 400.00 MiB, K (f16): 200.00 MiB, V (f16): 200.00 MiB llama_new_context_with_model: CPU output buffer size = 0.60 MiB llama_new_context_with_model: CPU compute buffer size = 19.19 MiB llama_new_context_with_model: graph nodes = 1406 llama_new_context_with_model: graph splits = 1 AVX = 1 | AVX_VNNI = 0 | AVX2 = 1 | AVX512 = 1 | AVX512_VBMI = 1 | AVX512_VNNI = 1 | FMA = 1 | NEON = 0 | ARM_FMA = 0 | F16C = 1 | FP16_VA = 0 | WASM_SIMD = 0 | BLAS = 1 | SSE3 = 1 | SSSE3 = 1 | VSX = 0 | MATMUL_INT8 = 0 | LLAMAFILE = 1 | Model metadata: {general.file_type: 15, general.quantization_version: 2, tokenizer.chat_template: “{% for message in messages %}{{<|im_start|> + message[role] + \n + message[content] + <|im_end|> + \n}}{% endfor %}{% if add_generation_prompt %}{{ <|im_start|>assistant\n }}{% endif %}”, tokenizer.ggml.bos_token_id: 151643, tokenizer.ggml.padding_token_id: 151643, tokenizer.ggml.eos_token_id: 151645, tokenizer.ggml.model: gpt2, qwen2.use_parallel_residual: true, qwen2.rope.freq_base: 1000000.000000, qwen2.attention.layer_norm_rms_epsilon: 0.000001, qwen2.embedding_length: 5120, qwen2.attention.head_count_kv: 40, qwen2.context_length: 32768, qwen2.attention.head_count: 40, general.architecture: qwen2, qwen2.block_count: 40, qwen2.feed_forward_length: 13696, general.name: Qwen1.5-14B-Chat-AWQ-fp16} Guessed chat format: chatml INFO: Started server process [75940] INFO: Waiting for application startup. INFO: Application startup complete. INFO: Uvicorn running on http://localhost:8000 (Press CTRL+C to quit) zsh: segmentation fault python3 -m llama_cpp.server –model –n_gpu_layers 0 –n_batch 32 –n_ctx 51在 python 调用时出现这个错误并且整个 llama-cpp-python 自动 shutdown 了。
…到这个时候我才意识到 ollama 的伟大之处,它的确降低了人工智能私有部署的门槛。虽然折腾到最后 llama-cpp-python 还是没能部署成功,但是这个应该跟 M1 芯片有关。llama-cpp-python 的 cookbook 单独用一个篇章有写 arm 结构下 Metal 的配置,而在试验时也的确检测到 Metal…只是最后未能用上而已。所以我觉得只是我机器的问题而已,有 M1 芯片的兄弟们可以试试。(不过话说回来如果有 M1 芯片的直接上 ollama 不爽吗)
基于 pytorch 方案
到现在为止基本可以确定的是:
本人的 MBP 无法使用 GPU 资源进行加速;无法使用 llama-cpp-python 部署模型然后通过 API 调用;ollama 能用但是响应速度太慢;因硬件资源问题只能使用低参数模型;只能使用纯 CPU + 内存方案进行部署;既然这样,那么索性将模型整合到 python 代码里面吧(采用之前 pytorch 方案)。这里我使用的是 Qwen/Qwen1.5-0.5B-Chat 模型(没办法啦,除了它真的都跑不起来了),如下图:
… import torch from transformers import AutoModelForCausalLM, AutoTokenizer pt_device = torch.device(“cpu”) # 模型名称 pt_model_name = “Qwen/Qwen1.5-0.5B-Chat” # 使用 pytorch 方式加载模型 pt_model = AutoModelForCausalLM.from_pretrained( pt_model_name, torch_dtype=“auto”, device_map=“auto” ) # 加载分词器 pt_tokenizer = AutoTokenizer.from_pretrained(pt_model_name) # 给模型一个人设定位 sys_content = “You are a helpful assistant and also a senior expert in the traditional Chinese medicine industry. You are very willing to provide me with detailed opinions to help me grow.” “”” 为PyTorch模型生成输入。 此函数以消息列表和批处理大小为输入。它使用pt_tokenizer将聊天模板应用于消息,禁用标记化并添加生成提示。然后使用pt_tokenizer对生成的文本进行标记化,并将其填充到指定的批处理大小。标记化的输入随后被转换为PyTorch张量并移动到pt_device。 Parameters: messages (List[Dict[str, str]]): 表示对话历史的字典列表。每个字典应该有键“角色”和“内容”。 batch_size (int): 输入所需的批量大小。 Returns: torch.Tensor: PyTorch模型的输入张量,形状为(批量大小,序列长度)。 “”” def pt_model_input(messages): text = pt_tokenizer.apply_chat_template( messages, tokenize=False, add_generation_prompt=True ) return pt_tokenizer([text], return_tensors=“pt”).to(pt_device) “”” 将给定的消息转换为PyTorch模型输入,并使用该模型生成文本。 Parameters: messages (List[Dict[str, str]]): 表示对话历史的字典列表。每个字典应该有键“角色”和“内容”。 batch_size (int, optional): 输入所需的批量大小。默认为4。 Returns: str: 从 PyTorch 模型生成的文本。 Note: – 此函数使用pt_tokenizer将聊天模板应用于消息,禁用标记化并添加生成提示。 – 然后使用pt_tokenizer对得到的文本进行标记,并填充到指定的批量大小。 – 将标记化的输入转换为PyTorch张量并移动到pt_device。 – PyTorch模型根据输入生成文本。 – 生成的文本使用pt_tokenizer进行解码,并跳过特殊标记。 – 仅返回第一个生成的文本。 “”” def pt_transfor_msg(messages): start_time = time.time() response_text = try: model_inputs = pt_model_input(messages) generated_ids = pt_model.generate( model_inputs.input_ids, max_new_tokens=1024) generated_ids = [ output_ids[len(input_ids):] for input_ids, output_ids in zip(model_inputs.input_ids, generated_ids) ] response_text = pt_tokenizer.batch_decode( generated_ids, skip_special_tokens=True)[0] except Exception as e: print(f”Error: {e}“) finally: execution_time = time.time() – start_time print( f”>>> function pt_transfor_msg totally use {execution_time} seconds”) return response_text # 预执行一次去加载模型到内存 _ = pt_transfor_msg([{“role”: “user”, “content”: “Hello”}]) “”” 根据给定的提示,使用PyTorch和Qwen模型生成响应。 Parameters: prompt (str): 生成响应的用户输入提示。 Returns: str: 生成的响应文本。 Note: – 此函数使用pt_tokenizer将聊天模板应用于消息,禁用标记化并添加生成提示。 – 然后使用pt_tokenizer对得到的文本进行标记,并填充到指定的批量大小。 – 将标记化的输入转换为PyTorch张量并移动到pt_device。 – PyTorch模型根据输入生成文本。 – 生成的文本使用pt_tokenizer进行解码,并跳过特殊标记。 – 仅返回第一个生成的文本。 “”” def pt_qwen_text(prompt): messages = [ {“role”: “system”, “content”: sys_content}, {“role”: “user”, “content”: prompt} ] return pt_transfor_msg(messages) “”” 一个函数,用于将用户的提示添加到会话历史记录中,并返回转换后的消息。 Parameters: prompt (str): 要添加到历史记录中的用户输入提示。 history (List[Dict[str, str]]): 表示会话历史的字典列表。每个字典都应该有关键字“role”和“content”。 Returns: 将用户提示添加到历史记录后转换的消息。 “”” def pt_qwen_chat(prompt, history): history.append({“role”: “user”, “content”: prompt}) return pt_transfor_msg(history) if __name__ == __main__: prompt = “中医药理论是否能解释并解决全身乏力伴随心跳过速的症状?” response = pt_qwen_text(prompt) print(“>>> “+response)本来是打算使用 gguf 模型来跑 llama_cpp 的,几乎尝试了所有参数都是抛出 “Segmentation fault: 11” 异常,估计还是电脑的问题吧。网上大部分能跑通的兄弟都是加了 “n_gpu_layers” 参数的,这个没有办法验证了,但还好最后还是通过 pytorch 跑通了。如下图:
(transformer) (base) MacBook-Pro:python yuanzhenhui$ /Users/yuanzhenhui/anaconda3/envs/transformer/bin/python /Users/yuanzhenhui/Documents/code_space/git/processing/python/tcm_assistant/learning/local_model.py Special tokens have been added in the vocabulary, make sure the associated word embeddings are fine-tuned or trained. >>> function pt_transfor_msg totally use 30.924490928649902 seconds >>> 中医药理论中的一些概念,如阴阳五行、脏腑经络等,可能在理解这些症状的根源上有一定的帮助。但是,具体的病因和治疗方案需要通过中医医生的专业判断来确定。 一般来说,全身乏力伴心跳过速可能是由于多种原因引起的,包括心肌梗死、心脏疾病、高血压、心脏病发作等。因此,中医理论不能简单地应用到所有的病症上,只能提供一些基本的诊断和治疗方法。 如果想要找出具体的病因,可以考虑通过检查血液中的糖水平、血压、血脂等指标,或者通过专业的医疗影像学检查,如心电图、X光片等。如果诊断结果显示没有心脏问题,那么可能是由其他原因引起的心力衰竭或糖尿病等慢性病所导致。 总的来说,虽然中医理论在一定程度上可能有助于理解一些疾病的发病机制,但并不是所有的问题都可以用中医方法解决。同时,中医治疗通常需要个体化的调整,不能代替药物治疗。虽然说兜兜转转还是回到原地,但是我觉得兜这一圈并不是没有意义的,最起码现在我是知道了几乎所有平台的 llm 本地部署方式和限制。虽然被这台 MBP 折磨够呛,但也因此获得了不少经验(能够分享出来的只是一小部分)。
希望这次分享能够让兄弟们走(掉)少(少)点(点)弯(头)路(发),也算是功德无量了。
后记:关于 GPTQ 使用问题
其实我还试过“
Qwen/Qwen1.5-MoE-A2.7B-Chat-GPTQ-Int4”模型。可能是因为 GPTQ 的问题,在运行之后发现以下的问题(虽然没用到但是记录一下)。1. No package metadata was found for optimum
File “/Users/yuanzhenhui/anaconda3/envs/transformer/lib/python3.11/importlib/metadata/__init__.py”, line 565, in from_name raise PackageNotFoundError(name) importlib.metadata.PackageNotFoundError: No package metadata was found for optimum这个问题可以通过“pip install datasets transformers optimum[graphcore]”来解决。
2. No package metadata was found for auto-gptq
File “/Users/yuanzhenhui/anaconda3/envs/transformer/lib/python3.11/importlib/metadata/__init__.py”, line 565, in from_name raise PackageNotFoundError(name) importlib.metadata.PackageNotFoundError: No package metadata was found for auto-gptq (transformer) (base) MacBook-Pro:python yuanzhenhui$ pip install auto-gptq Collecting auto-gptq Downloading auto_gptq-0.7.1.tar.gz (126 kB) ━━━━━━━━━━━━━━━━━━━━━━━━━━━━━━━━━━━━━━━━ 126.1/126.1 kB 303.9 kB/s eta 0:00:00 Preparing metadata (setup.py) … error error: subprocess-exited-with–error × python setup.py egg_info did not run successfully. │ exit code: 1 ╰─> [7 lines of output] Traceback (most recent call last): File “<string>”, line 2, in <module> File “<pip-setuptools-caller>”, line 34, in <module> File “/private/var/folders/74/mmb55nf927x36pb3bv43_zd40000gn/T/pip-install-t9gd_tqp/auto-gptq_c7ea0b93cf434a01b10e841b562b886a/setup.py”, line 62, in <module> CUDA_VERSION = “”.join(os.environ.get(“CUDA_VERSION”, default_cuda_version).split(“.”)) ^^^^^^^^^^^^^^^^^^^^^^^^^^^^^^^^^^^^^^^^^^^^^^^^^^^^^^^^^^ AttributeError: NoneType object has no attribute split [end of output] note: This error originates from a subprocess, and is likely not a problem with pip. error: metadata-generation-failed × Encountered error while generating package metadata. ╰─> See above for output. note: This is an issue with the package mentioned above, not pip. hint: See above for details.由于我没有 Nvidia 显卡自然也没有 CUDA 核心,因此需要使用“BUILD_CUDA_EXT=0 pip install auto-gptq”来进行安装。

AI时代,掌握AI大模型第一手资讯!AI时代不落人后!
免费ChatGPT问答,办公、写作、生活好得力助手!
扫码右边公众号,驾驭AI生产力!