ChatGLM-6B是清华大学知识工程和数据挖掘小组发布的一个类似ChatGPT的开源对话机器人,由于该模型是经过约1T标识符的中英文训练,且大部分都是中文,因此十分适合国内使用。
本文来自DataLearner官方博客:手把手教你本地部署清华大学KEG的ChatGLM-6B模型——Windows+6GB显卡版本和CPU版本的本地部署 | 数据学习者官方网站(Datalearner)
ChatGLM-6B在DataLearner官方的模型卡信息:ChatGLM-6B(ChatGLM-6B)详情 | 数据学习 (DataLearner)
根据GitHub开源项目公开的信息,ChatGLM-6B完整版本需要13GB显存做推理,但是INT4量化版本只需要6GB显存即可运行,因此对于个人本地部署来说十分友好。遗憾的是,官方的文档中缺少了一些内容导致大家本地部署会有很多问题,本文将详细记录如何在Windows环境下基于GPU和CPU两种方式部署使用ChatGLM-6B,并说明如何规避其中的问题。
安装前说明部署前安装环境1、下载官方代码,安装Python依赖的库2、下载INT4量化后的预训练结果文件Windows+GPU部署方案1、Windows+GPU方案的必备条件2、运行部署GPU版本的INT4量化的ChatGLM-6B模型Windows+CPU部署方案1、Windows+CPU方案的必备条件2、运行部署CPU版本的INT4量化的ChatGLM-6B模型总结安装前说明
尽管ChatGLM-6B的GitHub上提供了安装部署的教程,但是由于其提供的代码、预训练模型、配置文件并不是统一在一个地方,因此对于一些新手来说很容易出现各种错误。
此外,由于大多数人可能只有较少内存的GPU,甚至是只有CPU,那么只能部署量化版本的模型,这里也会有不一样的。
最后,部署ChatGLM-6B目前涉及到从GitHub、HuggingFace以及清华云的地址,下面我们将详细说明如何操作。
部署前安装环境
在部署ChatGLM-6B之前,我们需要安装好运行的环境。下面2个步骤是不管你部署CPU还是GPU版本都需要做的。
1、下载官方代码,安装Python依赖的库
首先,我们需要从GitHub上下载ChatGLM的requirements.txt来帮助我们安装依赖的库。大家只需要在GitHub上下载requirements.txt即可。下载地址:https://github.com/THUDM/ChatGLM-6B
文件如下图所示:
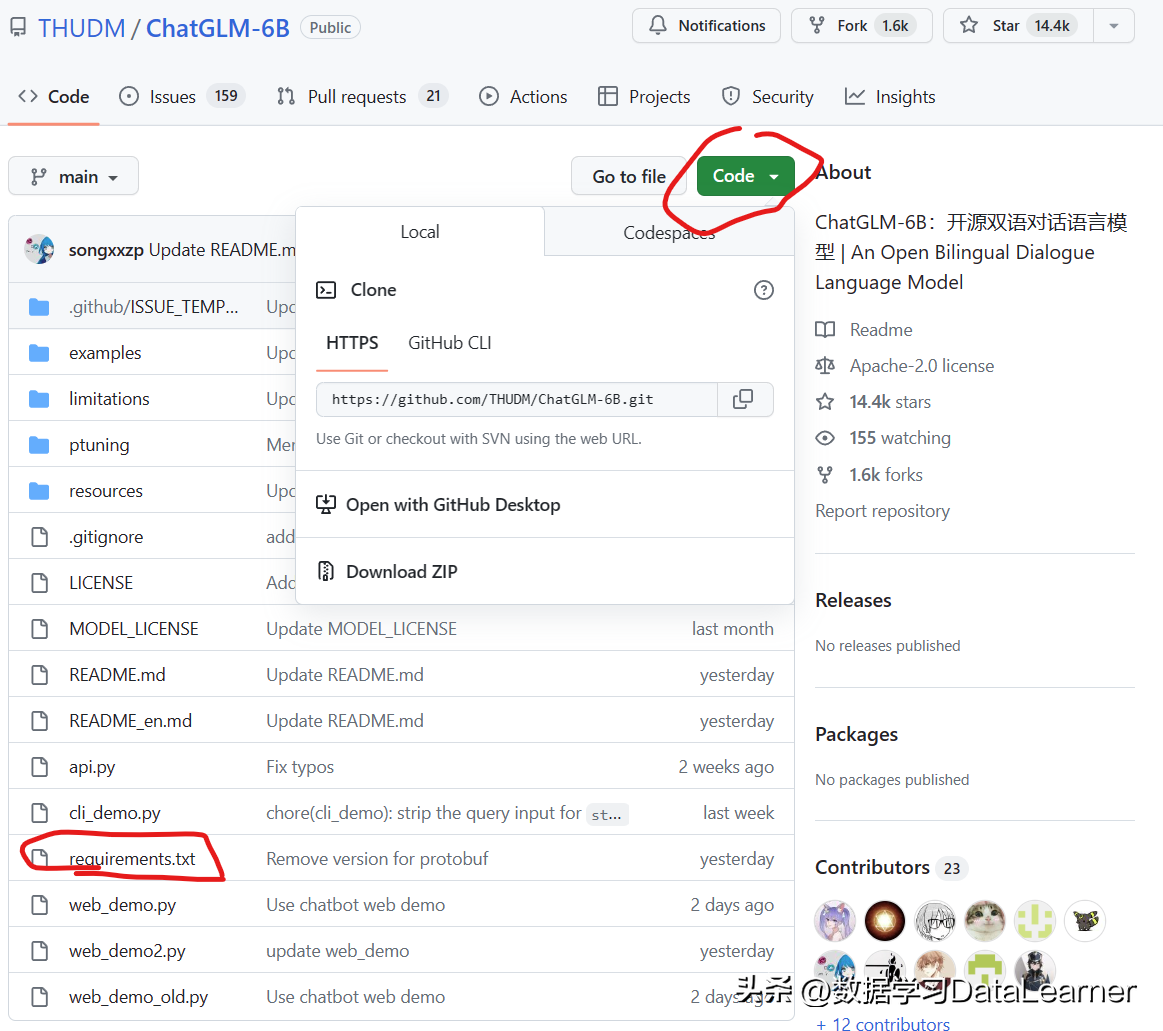
这个文件记录了ChatGLM-6B依赖的Python库及版本,大家点击右上角Code里面有Download ZIP,下载到本地解压之后就能获取这个文件。然后执行如下命令即可
pip install -r requirements.txt注意,这是从cmd进入到requirements.txt文件所在的目录执行的结果,这部分属于Python基础,就不赘述了。
需要注意的是,ChatGLM依赖HuggingFace的transformers库,尽管官方说:
使用 pip 安装依赖:pip install -r requirements.txt,其中 transformers 库版本推荐为 4.27.1,但理论上不低于 4.23.1 即可。
但是实际上,必须是4.27.1及以上的版本才可以,更低版本的transformers会出现如下错误:
AttributeError: Logger object has no attribute “warning_once”所以,一定要查看自己的transformers版本是否正确。
另外,ChatGLM-6B依赖torch,如果你有GPU,且高于6G内存,那么建议部署GPU版本,但是需要下载支持cuda的torch,而不是默认的CPU版本的torch。
2、下载INT4量化后的预训练结果文件
在上述的依赖环境安装完毕之后,大家接下来就要下载预训练结果。
INT4量化的预训练文件下载地址:https://huggingface.co/THUDM/chatglm-6b-int4/tree/main
需要注意的是,在GitHub上,官方提供了模型在清华云上的下载地址,但是那个只包含预训练结果文件,即bin文件,但实际上ChatGLM-6B的运行需要模型的配置文件,即config.json等,如下图所示:
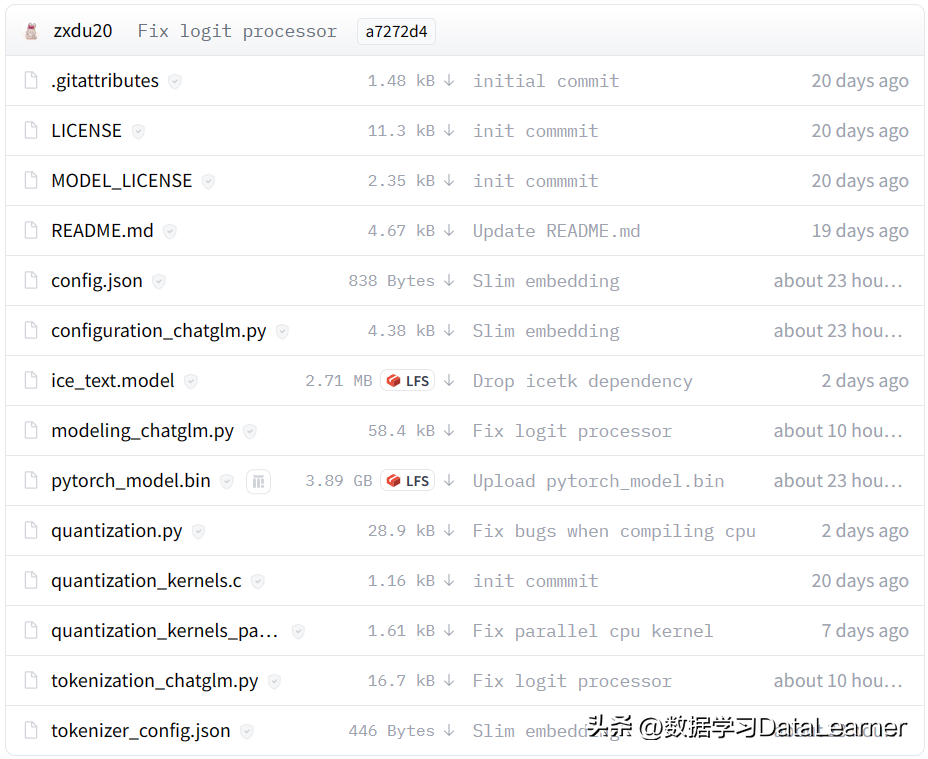
因此建议大家全部从HuggingFace上下载所有文件到本地。上述文件全部下载之后保存到本地的一个目录下即可,我们保存在:D:\\data\\llm\\chatglm-6b-int4
Windows+GPU部署方案
1、Windows+GPU方案的必备条件
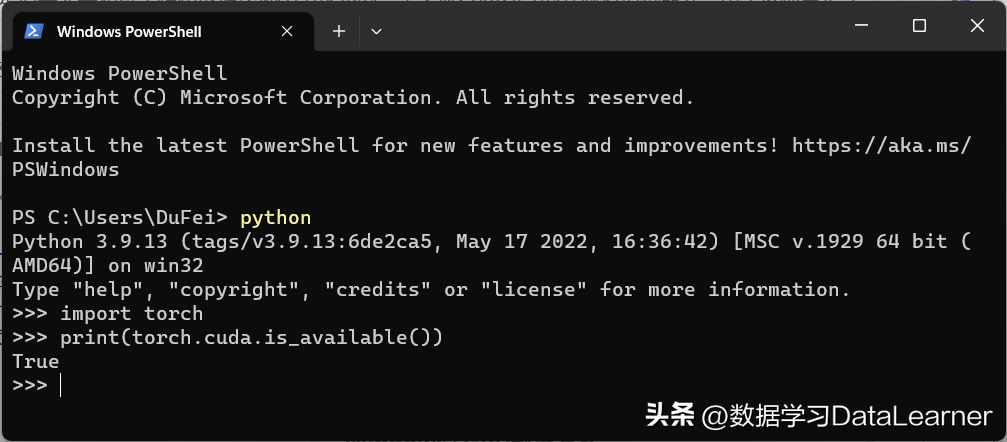
部署GPU版本的ChatGLM-6B需要安装cuda版本的torch,大家需要检测自己的torch是否正确,可以通过如下命令检查(下面是python代码):
import torch print(torch.cuda.is_available())如果以上代码输出的是True,那么恭喜你,你安装的是cuda版本的torch(注意,有显卡也需要大家下载cuda和cudann安装成功才可以,这部分大家可以去网上找教程)。如下图所示:
注意,目前ChatGLM-6B有3个版本可以使用,没有量化的版本做推理需要13G的GPU显存,INT8量化需要8GB的显存,而INT4量化的版本需要6GB的显存。
模型量化会带来一定的性能损失,经过测试,ChatGLM-6B 在 4-bit 量化下仍然能够进行自然流畅的生成。
本机只有6GB的显存,只能使用INT4版本了。
2、运行部署GPU版本的INT4量化的ChatGLM-6B模型
GPU版本的模型部署很简单,上述两个步骤完成之后即可运行。代码如下:
from transformers import AutoTokenizer, AutoModel tokenizer = AutoTokenizer.from_pretrained(“D:\\data\\llm\\chatglm-6b-int4”, trust_remote_code=True, revision=“”) model = AutoModel.from_pretrained(“D:\\data\\llm\\chatglm-6b-int4”, trust_remote_code=True, revision=“”).half().cuda() model = model.eval() response, history = model.chat(tokenizer, “你好”, history=[]) print(response)注意,这里有几个地方需要和大家说明一下。
首先,这里的地址都是D:\\data\\llm\\chatglm-6b-int4写法,即\\,不能写成D:/data/llm/chatglm-6b-int4。否则可能会出现如下错误:
>>> tokenizer = AutoTokenizer.from_pretrained(“D:\\OneDrive\\Programs\\llm\\chatglm-6b-int4”, trust_remote_code=True) Explicitly passing a `revision` is encouraged when loading a model with custom code to ensure no malicious code has been contributed in a newer revision. >>> model = AutoModel.from_pretrained(“D:/OneDrive/Programs/llm/chatglm-6b-int4”, trust_remote_code=True).half().cuda() Explicitly passing a `revision` is encouraged when loading a configuration with custom code to ensure no malicious code has been contributed in a newer revision. Traceback (most recent call last): File “<stdin>”, line 1, in <module> File “C:\Users\DataLearner\AppData\Local\Programs\Python\Python39\lib\site-packages\transformers\models\auto\auto_factory.py”, line 441, in from_pretrained config, kwargs = AutoConfig.from_pretrained( File “C:\Users\DataLearner\AppData\Local\Programs\Python\Python39\lib\site-packages\transformers\models\auto\configuration_auto.py”, line 911, in from_pretrained config_class = get_class_from_dynamic_module( File “C:\Users\DataLearner\AppData\Local\Programs\Python\Python39\lib\site-packages\transformers\dynamic_module_utils.py”, line 388, in get_class_from_dynamic_module final_module = get_cached_module_file( File “C:\Users\DataLearner\AppData\Local\Programs\Python\Python39\lib\site-packages\transformers\dynamic_module_utils.py”, line 273, in get_cached_module_file create_dynamic_module(full_submodule) File “C:\Users\DataLearner\AppData\Local\Programs\Python\Python39\lib\site-packages\transformers\dynamic_module_utils.py”, line 59, in create_dynamic_module os.makedirs(dynamic_module_path, exist_ok=True) File “C:\Users\DataLearner\AppData\Local\Programs\Python\Python39\lib\os.py”, line 215, in makedirs makedirs(head, exist_ok=exist_ok) File “C:\Users\DataLearner\AppData\Local\Programs\Python\Python39\lib\os.py”, line 215, in makedirs makedirs(head, exist_ok=exist_ok) File “C:\Users\DataLearner\AppData\Local\Programs\Python\Python39\lib\os.py”, line 215, in makedirs makedirs(head, exist_ok=exist_ok) [Previous line repeated 1 more time] File “C:\Users\DataLearner\AppData\Local\Programs\Python\Python39\lib\os.py”, line 225, in makedirs mkdir(name, mode) OSError: [WinError 123] 文件名、目录名或卷标语法不正确。: C:\\Users\\DataLearner\\.cache\\huggingface\\modules\\transformers_modules\\D:这是因为Windows版本路径分隔符的问题导致的。需要注意!
此外,我们的代码中加了revision=””参数,主要是规避如下告警:
Explicitly passing a revision is encouraged when loading a configuration with custom code to ensure no malicious code has been contributed in a newer revision.它不影响运行,但是会影响观感~~~
通过以上步骤我们可以得到如下结果:
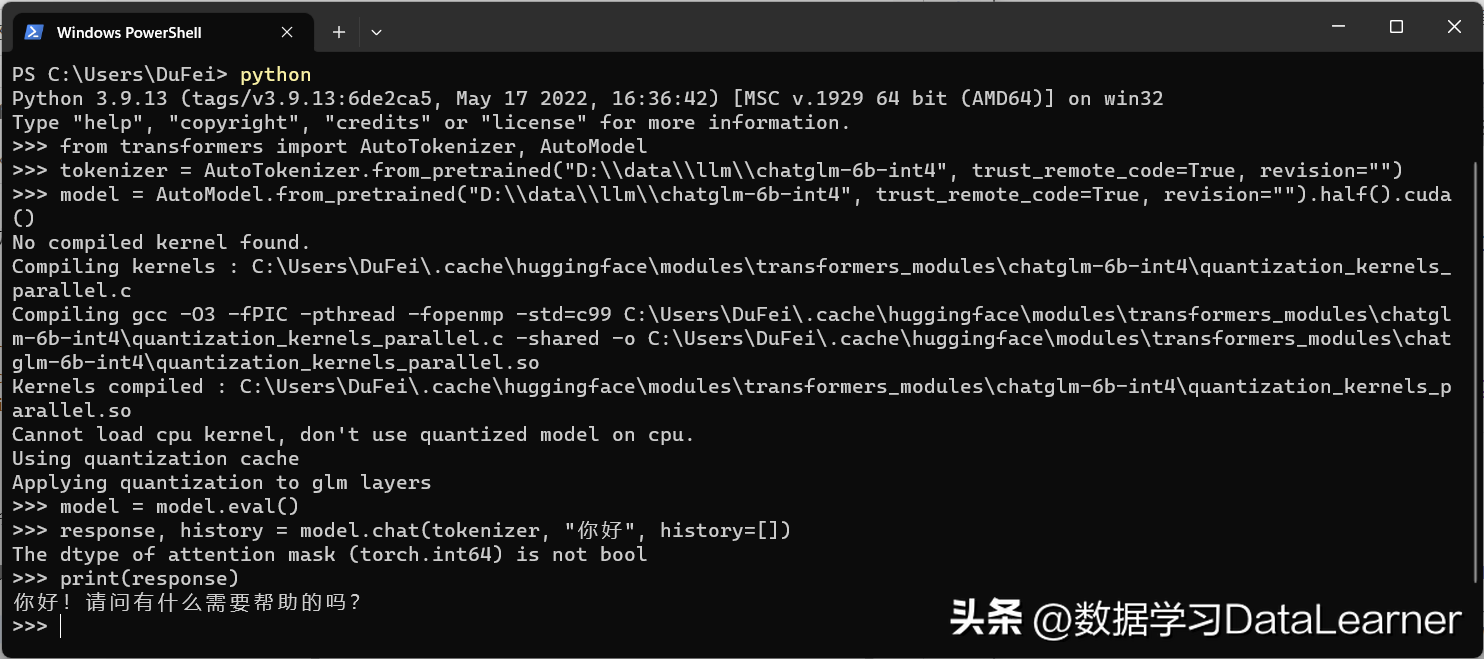
十分完美,我测试的结果,GPU版本大约只需要1-2秒即可获得结果(不严谨,没有测试复杂的输入!)
Windows+CPU部署方案
1、Windows+CPU方案的必备条件
CPU版本的ChatGLM-6B部署比GPU版本稍微麻烦一点,主要涉及到一个kernel的编译问题。
在安装之前,除了上面需要安装好requirements.txt中所有的Python依赖外,torch需要安装好正常的CPU版本即可。
但是,除了这些CPU版本的安装还需要大家在本地的Windows下安装好C/C++的编译环境。推荐安装TDM-GCC,下载地址:https://jmeubank.github.io/tdm-gcc/
大家直接点击上述页面中TDM-GCC 10.3.0 release下载安装即可,注意,安装的时候直接选择全部安装就好。安装完在cmd中运行”gcc -v”测试是否成功即可。
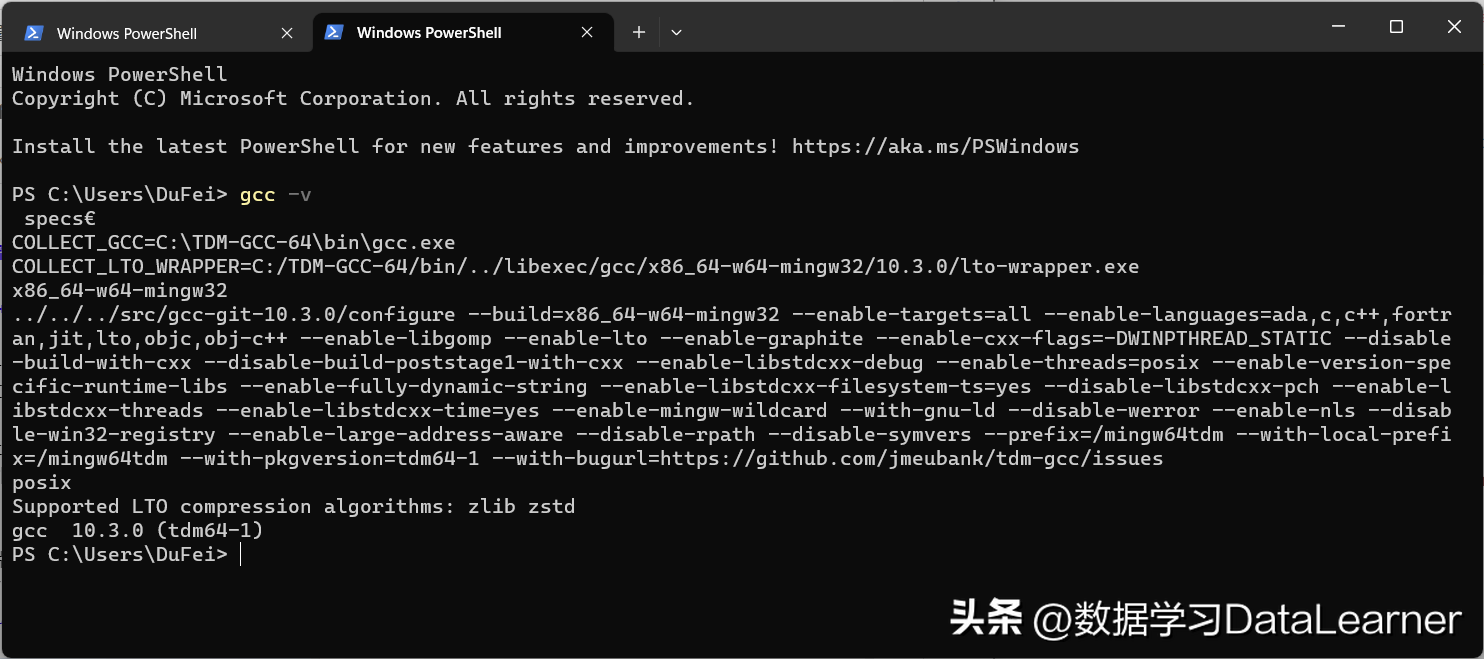
安装这个主要是为了编译之前下载的文件中的quantization_kernels.c和quantization_kernels_parallel.c这两个文件。如果大家在运行中遇到了如下错误提示:
No compiled kernel found. Compiling kernels : C:\Users\DuFei\.cache\huggingface\modules\transformers_modules\chatglm-6b-int4\quantization_kernels_parallel.c Compiling gcc -O3 -fPIC -pthread -fopenmp -std=c99 C:\Users\DuFei\.cache\huggingface\modules\transformers_modules\chatglm-6b-int4\quantization_kernels_parallel.c -shared -o C:\Users\DuFei\.cache\huggingface\modules\transformers_modules\chatglm-6b-int4\quantization_kernels_parallel.so Kernels compiled : C:\Users\DuFei\.cache\huggingface\modules\transformers_modules\chatglm-6b-int4\quantization_kernels_parallel.so Cannot load cpu kernel, dont use quantized model on cpu. Using quantization cache Applying quantization to glm layers那么就是这两个文件编译出问题了。那么就需要我们手动去编译这两个文件:
即在上面下载的D:\\data\\llm\\chatglm-6b-int4本地目录下进入cmd,运行如下两个编译命令:
gcc -fPIC -pthread -fopenmp –std=c99 quantization_kernels.c -shared -o quantization_kernels.so gcc -fPIC -pthread -fopenmp –std=c99 quantization_kernels_parallel.c -shared -o quantization_kernels_parallel.so如下图所示即为运行成功

然后,大家就可以在D:\\data\\llm\\chatglm-6b-int4目录下看到下面两个新的文件:quantization_kernels_parallel.so和quantization_kernels.so。说明编译成功,后面我们手动载入即可。
2、运行部署CPU版本的INT4量化的ChatGLM-6B模型
CPU版本量化模型的代码与GPU版本稍微有点差异,代码如下:
from transformers import AutoTokenizer, AutoModel tokenizer = AutoTokenizer.from_pretrained(“D:\\data\\llm\\chatglm-6b-int4”, trust_remote_code=True, revision=“”) model = AutoModel.from_pretrained(“D:\\data\\llm\\chatglm-6b-int4”,trust_remote_code=True, revision=“”).float() model = model.eval() response, history = model.chat(tokenizer, “你好”, history=[]) print(response)注意,其实就是第三行代码最后的float()有差异:
model = AutoModel.from_pretrained(“D:\\data\\llm\\chatglm-6b-int4”, trust_remote_code=True, revision=“”).float()GPU版本后面是.half().cuda(),而这里是float()。
如果你运行上面的代码出现如下错误:
The dtype of attention mask (torch.int64) is not bool Traceback (most recent call last): File “<stdin>”, line 1, in <module> File “C:\Users\DuFei\AppData\Local\Programs\Python\Python39\lib\site-packages\torch\utils\_contextlib.py”, line 115, in decorate_context return func(*args, **kwargs) File “C:\Users\DuFei/.cache\huggingface\modules\transformers_modules\chatglm-6b-int4\modeling_chatglm.py”, line 1255, in chat outputs = self.generate(**inputs, **gen_kwargs) File “C:\Users\DuFei\AppData\Local\Programs\Python\Python39\lib\site-packages\torch\utils\_contextlib.py”, line 115, in decorate_context return func(*args, **kwargs) File “C:\Users\DuFei\AppData\Local\Programs\Python\Python39\lib\site-packages\transformers\generation\utils.py”, line 1452, in generate return self.sample( File “C:\Users\DuFei\AppData\Local\Programs\Python\Python39\lib\site-packages\transformers\generation\utils.py”, line 2468, in sample outputs = self( File “C:\Users\DuFei\AppData\Local\Programs\Python\Python39\lib\site-packages\torch\nn\modules\module.py”, line 1501, in _call_impl return forward_call(*args, **kwargs) File “C:\Users\DuFei/.cache\huggingface\modules\transformers_modules\chatglm-6b-int4\modeling_chatglm.py”, line 1160, in forward transformer_outputs = self.transformer( File “C:\Users\DuFei\AppData\Local\Programs\Python\Python39\lib\site-packages\torch\nn\modules\module.py”, line 1501, in _call_impl return forward_call(*args, **kwargs) File “C:\Users\DuFei/.cache\huggingface\modules\transformers_modules\chatglm-6b-int4\modeling_chatglm.py”, line 973, in forward layer_ret = layer( File “C:\Users\DuFei\AppData\Local\Programs\Python\Python39\lib\site-packages\torch\nn\modules\module.py”, line 1501, in _call_impl return forward_call(*args, **kwargs) File “C:\Users\DuFei/.cache\huggingface\modules\transformers_modules\chatglm-6b-int4\modeling_chatglm.py”, line 614, in forward attention_outputs = self.attention( File “C:\Users\DuFei\AppData\Local\Programs\Python\Python39\lib\site-packages\torch\nn\modules\module.py”, line 1501, in _call_impl return forward_call(*args, **kwargs) File “C:\Users\DuFei/.cache\huggingface\modules\transformers_modules\chatglm-6b-int4\modeling_chatglm.py”, line 439, in forward mixed_raw_layer = self.query_key_value(hidden_states) File “C:\Users\DuFei\AppData\Local\Programs\Python\Python39\lib\site-packages\torch\nn\modules\module.py”, line 1501, in _call_impl return forward_call(*args, **kwargs) File “C:\Users\DuFei/.cache\huggingface\modules\transformers_modules\chatglm-6b-int4\quantization.py”, line 338, in forward output = W8A16LinearCPU.apply(input, self.weight, self.weight_scale, self.weight_bit_width, self.quantization_cache) File “C:\Users\DuFei\AppData\Local\Programs\Python\Python39\lib\site-packages\torch\autograd\function.py”, line 506, in apply return super().apply(*args, **kwargs) # type: ignore[misc] File “C:\Users\DuFei/.cache\huggingface\modules\transformers_modules\chatglm-6b-int4\quantization.py”, line 76, in forward weight = extract_weight_to_float(quant_w, scale_w, weight_bit_width, quantization_cache=quantization_cache) File “C:\Users\DuFei/.cache\huggingface\modules\transformers_modules\chatglm-6b-int4\quantization.py”, line 260, in extract_weight_to_float func = cpu_kernels.int4WeightExtractionFloat AttributeError: NoneType object has no attribute int4WeightExtractionFloat那么就是前面说的编译文件出了问题,那么就必须做上面说的编译操作,得到那2个so文件,然后手动加载。新代码如下:
from transformers import AutoTokenizer, AutoModel tokenizer = AutoTokenizer.from_pretrained(“D:\\data\\llm\\chatglm-6b-int4”, trust_remote_code=True, revision=“”) model = AutoModel.from_pretrained(“D:\\data\\llm\\chatglm-6b-int4”,trust_remote_code=True, revision=“”).float() model = model.quantize(bits=4, kernel_file=“D:\\data\\llm\\chatglm-6b-int4\\quantization_kernels.so”) model = model.eval() response, history = model.chat(tokenizer, “你好”, history=[]) print(response)比原来的代码多了model = model.quantize(bits=4, kernel_file=”D:\\data\\llm\\chatglm-6b-int4\\quantization_kernels.so”)一行手动加载的内容。
接下来你就可以看到如下界面:
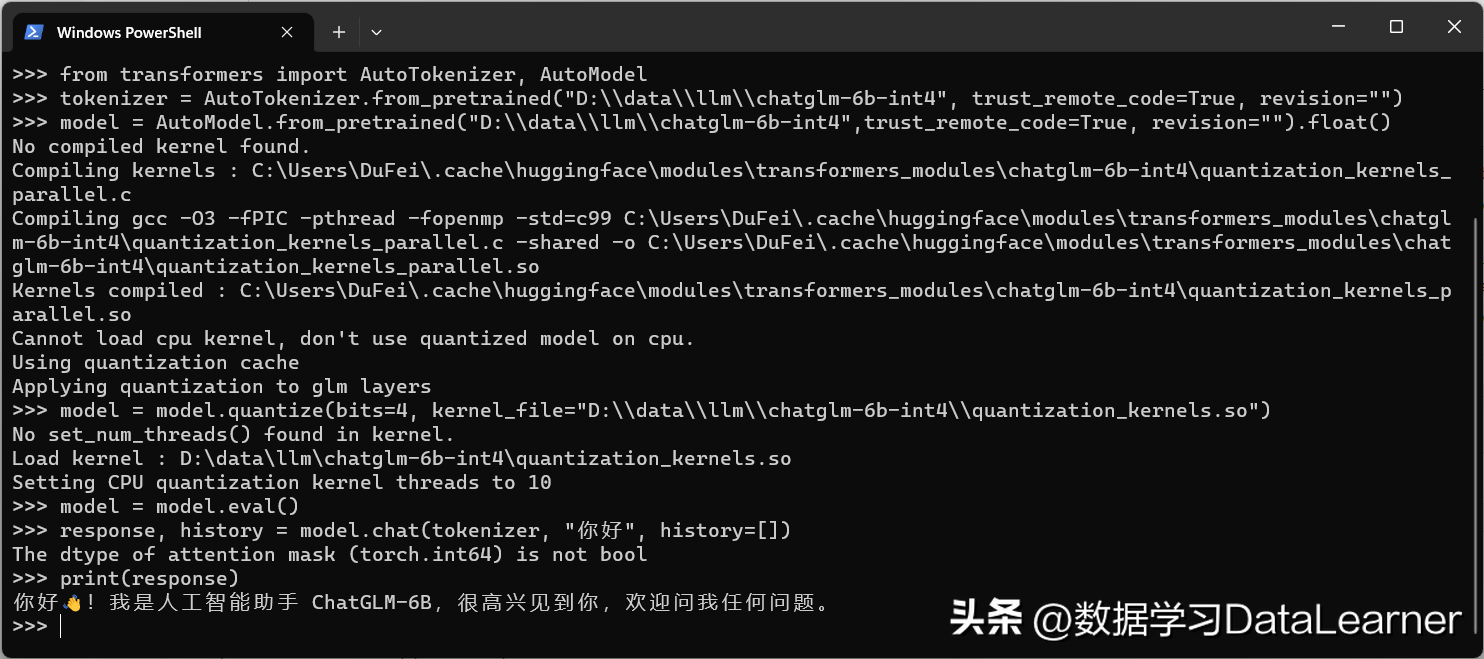
也就是CPU版本的ChatGLM-6B运行成功了!撒花~~
经过测试,我这里CPU版本的模型推理运行一次约1-2分钟,实在是太慢了,基本不适合使用。大家有机会还是搞GPU版本吧!
总结
经过上面的部署,基本上大家都可以成功。但是也可以发现CPU版本的模型不管是部署还是运行都很差,所以如果你还想跟上本轮的AI浪潮,还是建议搞个GPU吧。
ChatGLM是非常优秀的国产开源人工智能对话模型,影响也很大。后续还会有13B版本的模型出现,但是大概率本地部署是不太可能了~
希望随着时间基本能有新的技术降低部署成本吧,我们保持关注!~~~~


